 I've just made a couple of these. Very simple to do and quite quick. Cut random pieces of cloth into squares about 2cm square and poke them into a polystyrene ball with something like a stylus. You need it pointed but not sharp. Cover the ball all over and then either poke a hole at the top, put a drop of glue in the hole and push a knotted loop of ribbon in for a bauble or push a length of dowel in the bottom for a tree. To make it stand up I bought a pack of plastic champagne glasses from the pound shop and used the bases, which just pop off, pushed on to the bottom of the dowel.
Wednesday, 10 August 2016
Rag trees
I've just made a couple of these. Very simple to do and quite quick. Cut random pieces of cloth into squares about 2cm square and poke them into a polystyrene ball with something like a stylus. You need it pointed but not sharp. Cover the ball all over and then either poke a hole at the top, put a drop of glue in the hole and push a knotted loop of ribbon in for a bauble or push a length of dowel in the bottom for a tree. To make it stand up I bought a pack of plastic champagne glasses from the pound shop and used the bases, which just pop off, pushed on to the bottom of the dowel.
Sunday, 15 November 2015
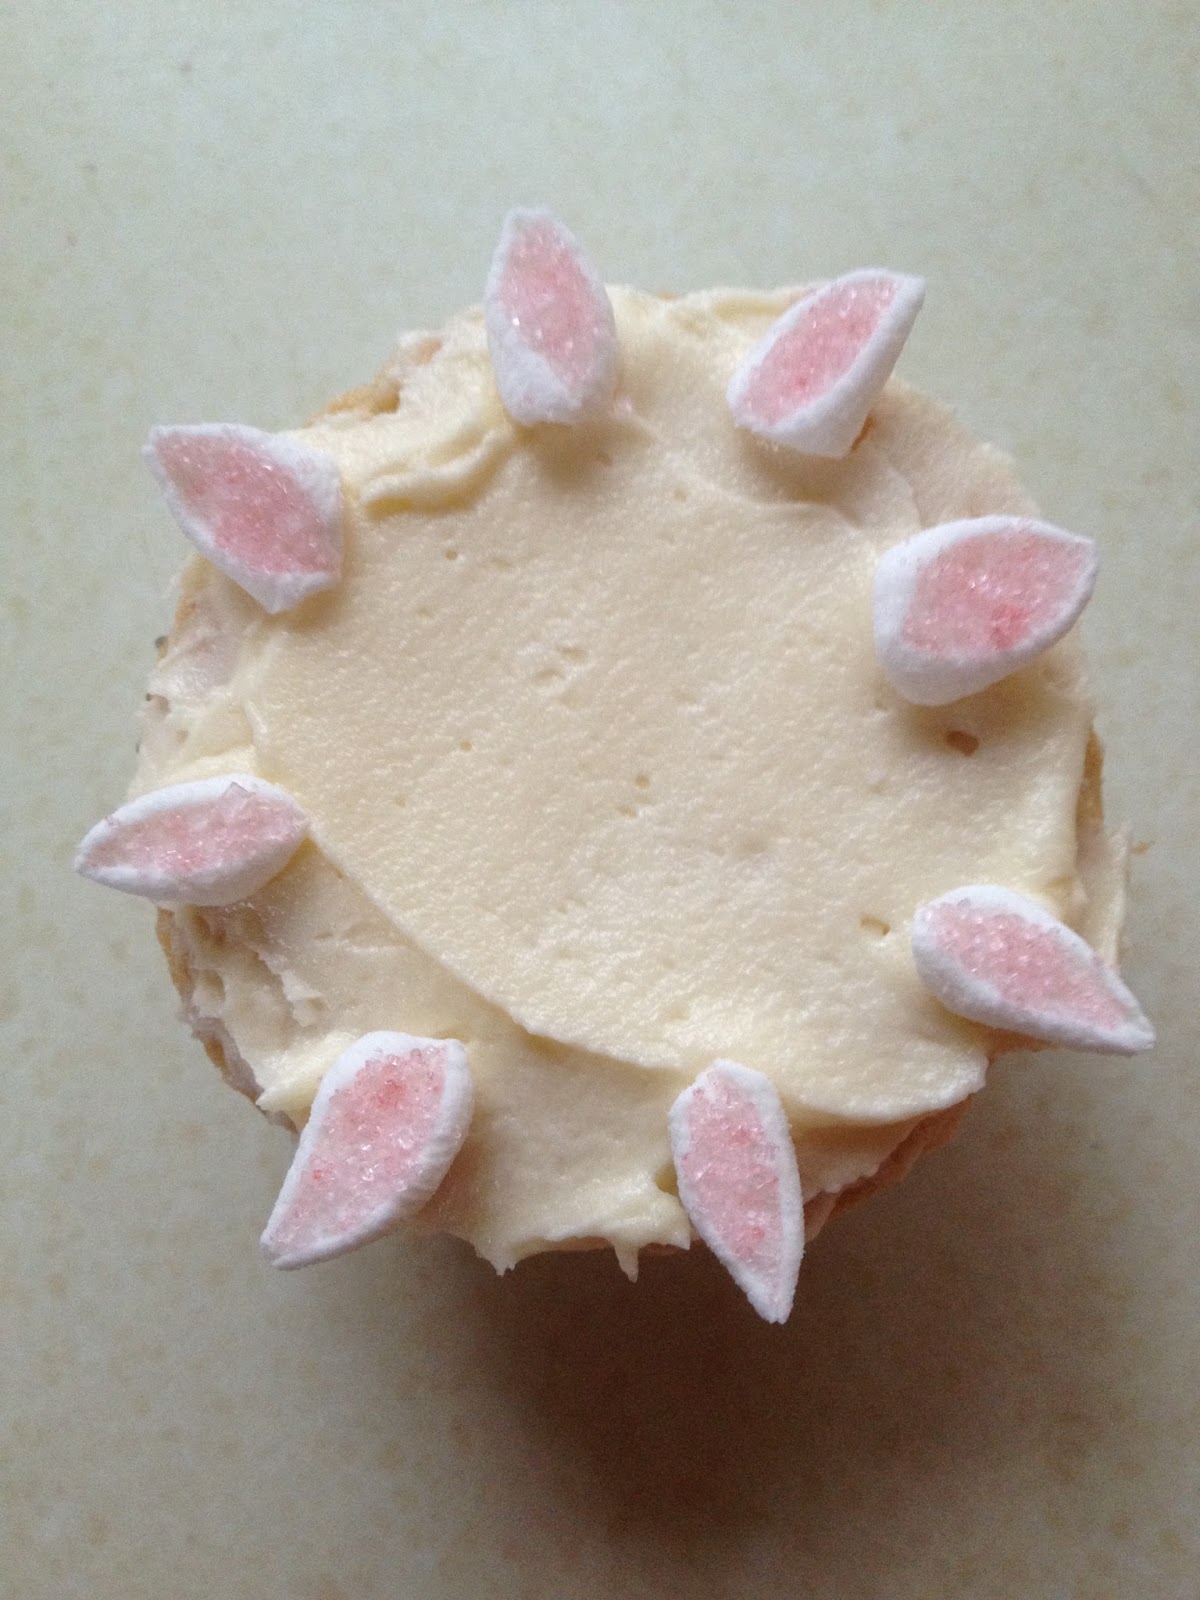
Decorated cupcakes
I went to the annual WI supper and dance last night and my contribution was to be 12 cup cakes. I learned how to do these when I attended a cake decorating course a few years ago. A very thoughtful present from one of my sons! They are very easy but look spectacular.


I made the cupcakes with a basic Victoria sponge recipie
8oz Self Raising flour
8oz Sugar
8oz Soft Margarine such as Stork
4 eggs.
You also need
Butter icing Make some butter icing by mixing 8oz icing sugar with 4oz margarine until combined. (Using soft margarine gives a softer consistency which you need for these cakes.)
1 pack of mini marshmallows
Silver or coloured dragees, mine were pearl pink and white
Coloured sugar (Two teaspoons of sugar and 1 drop of food colouring, mix well and leave overnight. Just before using, break up the sugar crystals with the back of a teaspoon.)
Cream the margarine with the sugar until it is turns light in colour and is all mixed in. Add an egg with a little of the flour and mix in. Do the same with the other eggs and finally add the rest of the flour. I used large cupcake cases and this mix made 20 cupcakes. Fill each case about three quarters full as you need a level top on the cake. Bake for aprox. 20 minutes at gas mark 5
 Place the cakes on a wire trivet to cool.
Using the mini marshmallows cut them diagonally across.
 I did about 50 at a time. Holding each half marshmallow by the tip dip the cut side into your coloured sugar, if using. Starting at the top of the cake place the marshmallows in the 12, 3, 6, and 9 positions of the clock. This gives you a rough idea of symmetry. Add more marshmallows around the rim until it is full.
 Do the second inner ring the same and then the third.

Finally add three dragees to the center.
All done!

As you can see you can vary the colours and use different coloured sugar as well. It is also possible to get a fuller look by doing four circles of marshmallows but I didn't have enough time for that!


8oz Self Raising flour
8oz Sugar
8oz Soft Margarine such as Stork
4 eggs.
You also need
Butter icing Make some butter icing by mixing 8oz icing sugar with 4oz margarine until combined. (Using soft margarine gives a softer consistency which you need for these cakes.)
1 pack of mini marshmallows
Silver or coloured dragees, mine were pearl pink and white
Coloured sugar (Two teaspoons of sugar and 1 drop of food colouring, mix well and leave overnight. Just before using, break up the sugar crystals with the back of a teaspoon.)
Cream the margarine with the sugar until it is turns light in colour and is all mixed in. Add an egg with a little of the flour and mix in. Do the same with the other eggs and finally add the rest of the flour. I used large cupcake cases and this mix made 20 cupcakes. Fill each case about three quarters full as you need a level top on the cake. Bake for aprox. 20 minutes at gas mark 5

Using the mini marshmallows cut them diagonally across.


Finally add three dragees to the center.
All done!

As you can see you can vary the colours and use different coloured sugar as well. It is also possible to get a fuller look by doing four circles of marshmallows but I didn't have enough time for that!
Sunday, 8 November 2015
Superb Snowflakes
Isn't nature wonderful? I found these amazing pictures that I just need to share. We all know that snowflakes are six sided and no two are the same but these pictures are exceptional with amazing detail.


Thursday, 22 October 2015
My first proper Book Fold
The first proper book fold I've done. I've just come back from Malta where I went for my friends daughters wedding. Before I went I thought I would take something to do if I had any spare time. I was thinking this because I get up early and I knew none of their family did and there is only so much breakfast you can eat! So I took the pattern, a paper ruler, bit of ribbon, pencil and rubber then " borrowed" a hardback book from the left-behind-bookshelf and did this sitting on my balcony the day before the wedding. I was really pleased with it as I was convinced I had done it upside down until I started folding the pages and the word appeared like magic!
 Thanks to Jo Black at Allinthefolds for the free pattern.

Sunday, 11 October 2015
Amazing Rainbow

Saturday, 10 October 2015
My Daughters Birthday cake this year

Jelly Worms

A packet of jelly, the hard block type, seems to work better than the crystals. Kosher jelly comes in wonderful flavours and colours but turns back to water overnight.
Straws, thick ones work best, save McDonalds ones if you can't get any. If you use the ones with the concertina bendy bit pull them out to their full length as it gives the 'saddle' on the worm.
A tall glass such as a pint glass as your worms will be the length of your glass.
Cooking spray, Lurpack is a good one.
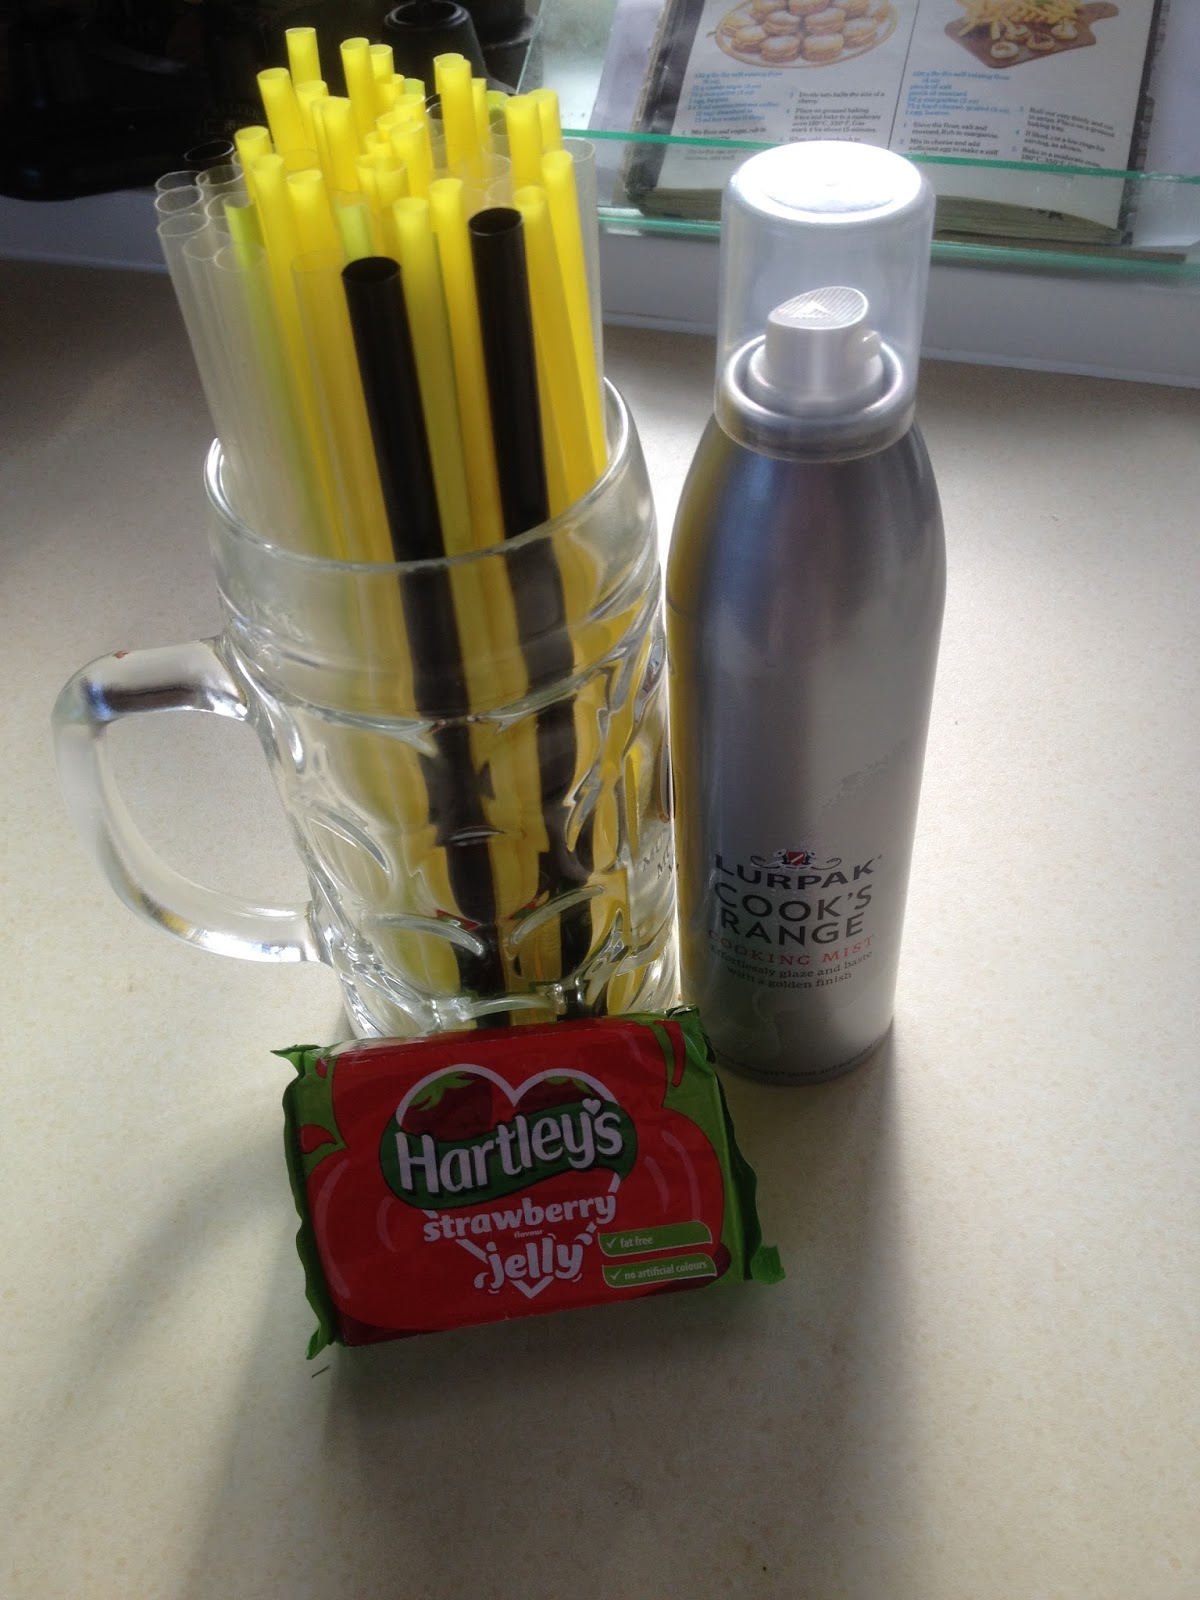
Make the jelly up to the packet instructions but just to three quarters of a pint or 425ml.
Holding the straws as a bunch in your hand spray the oil straight down the straws, turn them around and spray up the other end. Shake them a bit or tap them on the bench to get the oil distributed.


Pull one straw out of the glass and grip the top of the straw in your right hand (assuming you're right handed). Then grip the straw with your left finger and thumb and squeeze the straw while pushing down. The worm should come out easily.


The 'saddle' on the worm from the bendy straw.

I'm going to start my blog up again, after an absence of two years or so. As usual, life gets in the way but I can but try. So for my first new post I've done a short tutorial for jelly worms. Something topical with Hallow'een coming up and I know a lot of people have come unstuck (literally!) with this one.
Saturday, 26 September 2015
Three Cheese Italian Rigatoni Pie
 Three Cheese Italian Rigatoni Pie
Ingredients
1 pound Rigatoni
1 jar of your favorite pasta sauce (approximately 2.5 cups, give or take. If it's slightly more or less, just use it all)
½ cup of water
2 Tablespoons olive oil, divided
1 pound ground beef or ground pork
1 cup Parmesan cheese
1 container cottage cheese (or ricotta cheese)
1 large egg
1-1/2 to 2 cups mozzarella cheese
Instructions
Cook the Rigatoni in a large pot of salted, boiling water. Make sure you use enough water because the rigatoni sucks up a lot. Cook it about 1 minute less than the package directions so it is still hard enough to stand up. Drain the pasta and rinse under cold water.
Toss pasta with 1 Tablespoon of oil to prevent it from sticking. Then add the Parmesan cheese and toss until the cheese is evenly distributed. Set aside.
In a large frying pan, brown the ground beef in 1 Tablespoon of oil. Drain away the fat once it's cooked.
Add the jar of pasta sauce and water and bring to a boil.
Reduce heat. Cover and simmer for at least 20 minutes. The longer you simmer the better. Just make sure you add more water if it all boils off.
Remove from heat and let it cool for 10 minutes.
Mix together the container of cottage cheese and the egg. Set aside.
Preheat the oven to 400 degrees Fahrenheit.
Grease a 9 inch spring form pan.
Take the cooked rigatoni and stand each piece up on its end in the pan. Continue until the whole pan is tightly packed.
Pour the cottage cheese mixture over the rigatoni and spread evenly over all the noodles.
Pour the meat mixture over top and spread evenly over the noodles. Use your finger to poke the meat and cheese mixture down into the noodles. The more patience you have with this step, the better it will be.
Bake for 15 minutes at 400F.
Remove from the oven and top with the mozzarella cheese.
Bake for another 15 minutes at 400F.
Let stand for 10 minutes then run a knife around the edge of the pan to help remove the spring form pan.
Thursday, 22 August 2013
Minion Card

You need a sheet of A4 240gsm black card folded in half.
Cut a sheet of bright yellow card slightly smaller than the front of the card and stick down.
Cut two 2 inch circles in grey, two 1.5 inch white circles, two 1 inch brown circles and two half inch black circles. These make up the eyes.
Cut and stick a half inch strip of black card or paper and stick it across the front as above about a quater of the way down the face then stick the eyes on top of this. I used sticky pads for this bit so the eyes are slightly proud of the card.
Cut a 2 inch circle for the mouth, Cut it in half then cut a semi circle out leaving the shape of the mouth as above. Note that the mouth is narrower at the left hand side than on the right. Cut across the edges, straight on the left side and at an angle on the right.
Cut a rectangle 3 and a half inches by two and a half inch strip for the dungarees and straps and stick down as in the picture.
The pocket is a 2 inch circle with the top cut off and inked in brown around the edges.
The logo is a black 1 inch circle with a blue square cut to fit. Punch a hole through the middle with an ordinary paper punch then, with the square standing on it's corner, cut the right hand corner out and stick a tiny sliver of blue on to it to make the horizontal stroke of the G.
I finished with four strips of black for the hair and two black gems for buttons. A small 21 is mounted at the bottom but obviously any sentiment can be put here.
I texted her the picture and she replied "That's amazing!!!" So that will do for me!
Monday, 12 August 2013
Chocolate Wrappers

A nice suprise of nature
Trying to tidy the garden today, (again), I walked behind the sandpit and discovered these. They are wild strawberries, I didn't plant them but they are growing in the dirt and sand that has accumulated underneath the study window. The seeds must have been blown there and have grown undisturbed. They actually look better than my strawberries at the allotment but..... they have no taste whatsoever!


Sunday, 11 August 2013
My life
Sometimes I wonder why I am the way I am. I have always been the hands on type, I'll try anything, help anyone and so on and over the years I've learned how to do a lot of things But... today I was standing balanced on top of a wooden gate six foot in the air, leaning over an eighteen inch gap, splotches of tar all over my arms and legs and banging nails into the shed roof. I'm fifty-six years old! I should be sitting in a deckchair, knitting, letting someone else do the work.
Isn't it funny though, I wouldn't do that, I would want to be involved in whatever is going on. Also I still think I know best. My son was helping and between us we did a pretty good job. I ended up thinking that I am still teaching and guiding
 my kids, Will now knows how to re-felt a shed roof.
Isn't it funny though, I wouldn't do that, I would want to be involved in whatever is going on. Also I still think I know best. My son was helping and between us we did a pretty good job. I ended up thinking that I am still teaching and guiding

Raspberry Crumble Cake

Rub 4oz butter into 4oz of self raising flour until it resembles bread crumbs. Stir in 4oz sugar. Put half the mixture into a silicone cake "tin" and press it firmly down with the back of a spoon or your knuckles. Pour a punnet of raspberries over the mixture and press gently down. Add the remaining mixture and press down with the back of a spoon again. Bake for aprox 20 mins gas mark 5. Remove from the oven when cooked and stand a flat plate on top with a couple of tins or a bag of sugar on top of that. Leave to cool. I found that this was best served after being refrigerated and with some thick cream on top.
Thursday, 8 August 2013
This is the cake I made for my daughters boyfriend's 21st.
 It was a rainbow cake that I had seen on the Internet a few times. The first one I made was for my son's 21st. They were really pleased and surprised with it so I thought I would do another. It is a basic Victoria sponge recipe but with the ingredients trebled.
Cream together 12oz margarine and 12oz sugar until it is white and creamy. Gradually add 12oz self raising flour and 6 eggs alternatively
Divide between six bowls.
 .Add gell food colouring Red, yellow, blue, green, purple and orange. Gell colouring is better as ordinary bottled colouring dilutes the mixture too much. Use an ice cream scoop to divide the mixture equally into the sandwich tins. I used two silicone "tins" I bought from the pound shop giving them a quick spray of 1 calorie oil before putting the mixture in.Bake at gas mk 5 for aprox 20 minutes.
When cooked and cooled sandwich together with butter icing (8oz butter mixed with 1lb icing sugar). Just put a thin coat on each layer as there will be five lots of butter icing between the layers as well as all over the cake. Cover the cake with the rest of the butter icing.

 To decorate the cake I cut the numbers "21" out using my Cricut but I used the negative placed on top of the cake and, placing a piece of paper diagonally over the stencil, I sprinkled the first colour on. I then moved the paper about a sixth of an inch over and sprinkled over the next colour and so on.
I then had the choice of either picking off the few sprinkles I had accidentally spilled or adding a few more to the cake. You can see what I decided to do! I put 21 candle holders around the cake and bought some rainbow candles from Asda. They are not on the cake as it had to travel. I haven't seen the inside of one of the cakes yet, although I am told there is a picture somewhere!

Cream together 12oz margarine and 12oz sugar until it is white and creamy. Gradually add 12oz self raising flour and 6 eggs alternatively
Divide between six bowls.

When cooked and cooled sandwich together with butter icing (8oz butter mixed with 1lb icing sugar). Just put a thin coat on each layer as there will be five lots of butter icing between the layers as well as all over the cake. Cover the cake with the rest of the butter icing.


I then had the choice of either picking off the few sprinkles I had accidentally spilled or adding a few more to the cake. You can see what I decided to do! I put 21 candle holders around the cake and bought some rainbow candles from Asda. They are not on the cake as it had to travel. I haven't seen the inside of one of the cakes yet, although I am told there is a picture somewhere!


Wednesday, 7 August 2013
Memory Journal
I made this for a friend's Birthday. It's an amalgamation of a few things I have seen and filed away either on my laptop or in my head!
The idea is that you have a journal and when you have a few spare minutes to write you pull a memory reminder out of the jar and write down your memories or thoughts.
 I have used an ordinary spiral bound writing book from Asda for, I think, 28p. Cut a piece of brown card to fit the front cover and glue together.Choose about six co-ordinating papers and cut them into oblongs of
different sizes to fit the front of the journal. Glue down leaving a
small gap between each paper.
I have used an ordinary spiral bound writing book from Asda for, I think, 28p. Cut a piece of brown card to fit the front cover and glue together.Choose about six co-ordinating papers and cut them into oblongs of
different sizes to fit the front of the journal. Glue down leaving a
small gap between each paper.

 I then downloaded various questions from the internet and cherry-picked what was relevant to my friends life. I grouped them into sixes with a different font for each group and double spacing between each question then printed them out onto matching scrapbook paper.
 Cut the papers into strips and fold or curl in a few different ways then put into the kilner/mason jar. I added a tag decorated in the same way to match the journal and finally tied three pieces of matching raffia around the top of the jar. I also covered a pen in matching scrapbook paper to go with it. Again it was a cheap pen from Asda, a pack of 10 for 90. Simply cover with an oblong of paper and stick a flat bottomed jewel on the top.
The idea is that you have a journal and when you have a few spare minutes to write you pull a memory reminder out of the jar and write down your memories or thoughts.


Tuesday, 6 August 2013

A Journal
I made a journal for my daughter. She was so taken with it she asked me to cover some more books for her to use when she goes back to university.
I started with a plain note book and just covered it with nice paper. (from Paperchase)

 Inside I stuck an envelope for bits and pieces onto the back of the front cover and a paper ruler. On the right is a cut down envelope that belonged to my daughter with her nick-name on it. This holds three different sized tags that she can use to write on or as bookmarks.

 Evenly spaced out inside the journal are two more decorated pages. The top one has post-it notes stuck on and the other is decorated with a nice poem and a picture of our dog. When you decorate these paper pages you need to stick about three of them together for strength. Each page has a marker tag sandwiched between the pages as well.
 This is the inside back cover. I made a pocket with a cut up sheet of printed paper and printed out another saying.
I enjoyed doing this and may do some more in the future.
I started with a plain note book and just covered it with nice paper. (from Paperchase)

The doll is a stamp by Julie Nutting. I stamped it onto brown paper then stamped the
dress onto patterned paper, this way you get the lines of the dress
superimposed onto the paper. Glittered shoes and a hair band complete
the doll. I printed out the saying and added the embellishments including extra glitter onto bits of the background.


I enjoyed doing this and may do some more in the future.
Subscribe to:
Posts (Atom)